How to Easily Airdrop Your Newly Created Token on Tezos
A step-by-step guide on how to airdrop FA2 tokens to multiple Tezos wallets using community-developed tools.
5 minute read

We are back with another installment in our Tezos Decentralized Finance (DeFi) series. So far, we’ve covered how to make your own token, set up a liquidity pool, and get a farm up and running on Tezos. Pretty cool stuff, right? Well, we’re not done yet. This time, we’re looking into something super handy: distributing your token, through airdrops.
In this piece, we will break down the tools and tricks for finding out who holds certain tokens or NFTs, and demonstrate how to send your tokens over to them in one batch. This isn’t just about getting your token out there; it’s also a neat way to say thanks to the folks who’ve supported your NFTs or other FA2 tokens.
For this guide and as an example, I will airdrop my DSB token that I created in previous guides, to the holders of the Ottez Gen2 NFTs. Ready to get into it? Let’s roll!

Step 1 - Getting the lists of wallets that will be airdropped #
To begin, we need the wallet addresses of every individual holding Gen2 Ottez NFTs. To get this information, we’ll use the Fans/Collectors tool developed by the remarkable NFTBiker. From the “Fans/Collectors” webpage, we enter the Ottez GEN2 NFT contract address into the designated field and hit the “Check” button.
Shortly after, a list showing all the holders and their respective wallet addresses will appear in the section below. The page should appear as follows:
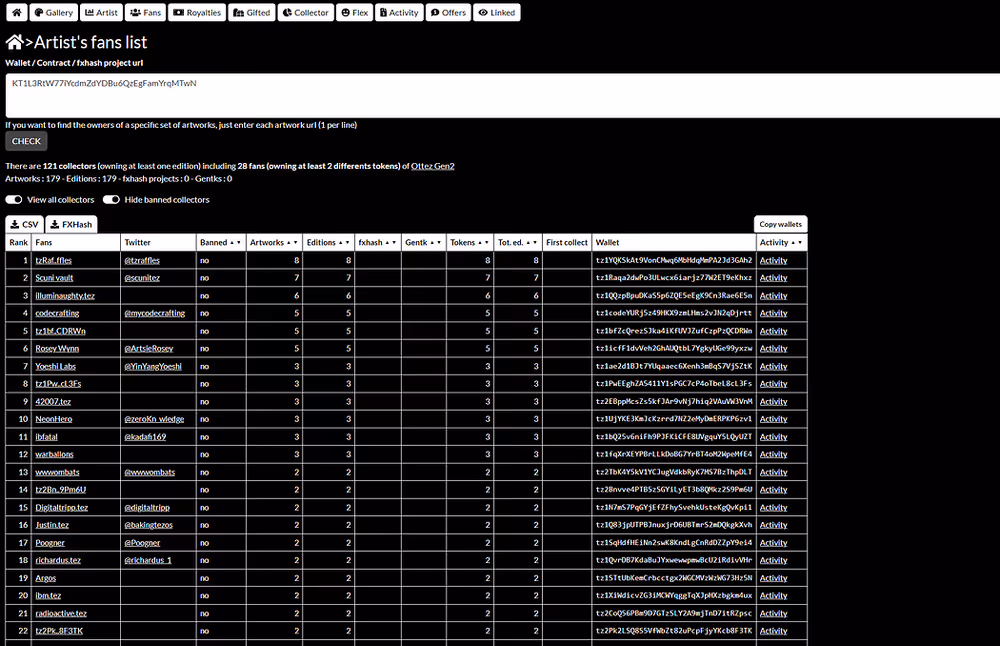
At this point, we click the “Copy Wallets” button and save them somewhere as we will need them in the next step.
Step 2 - Preparing the airdrop #
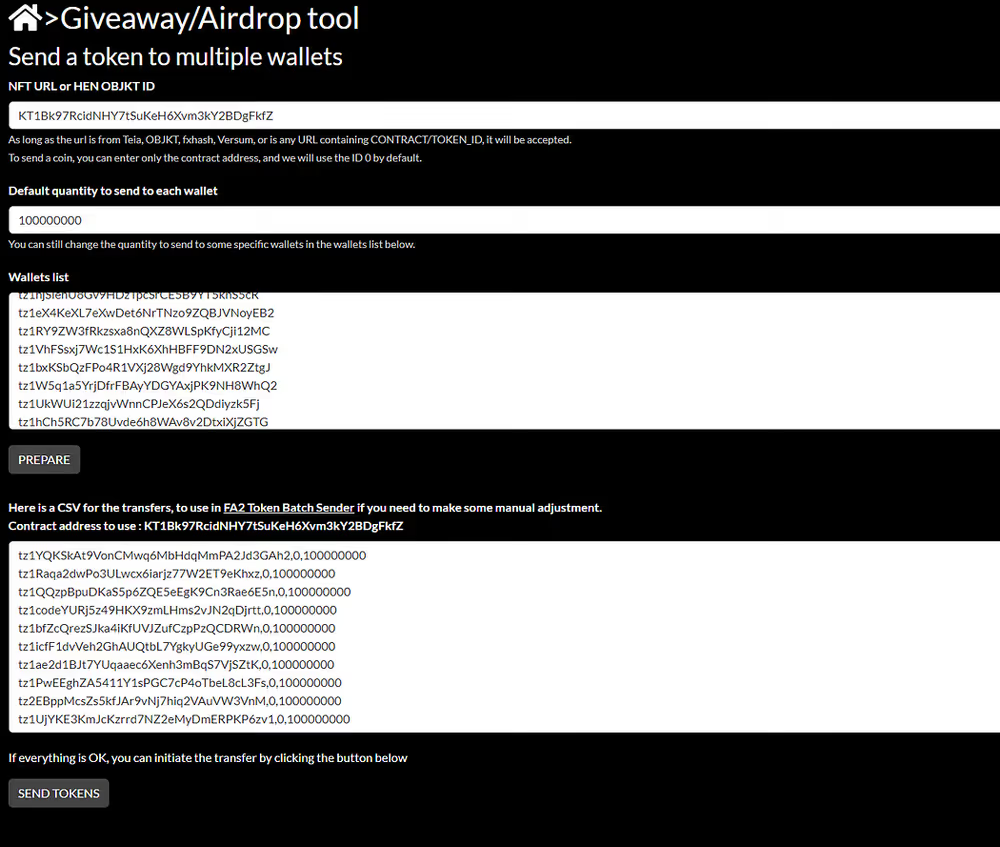
Alright, now that we’ve got our list of wallets sorted out, let’s dive into the next steps for the airdrop and get into the nitty-gritty. We’re going to pull out another tool from the NFTBiker toolbox, this time it’s the “Giveaway/Airdrop” gadget. Heading over to the tool’s site and connecting our wallet, we’re faced with three blanks to fill out:
First, we paste in the contract address of the token we’re dropping in. If it’s an NFT that you’re airdropping, just drop the URL of that NFT from places like Objkt, Teia, or fx(hash). The tool will fetch the contract address and token ID all by itself.
Next, in the second slot, we’re typing in how much of the good stuff each wallet’s gonna get. Keep in mind, if you’re dropping a token with decimals (just like I am), those extra zeros matter as this field requires you to input the amount in decimals. For example, the token I am airdropping (DSB) has six decimals, so to send 100 DSB to each wallet, I will input 100,000,000 (the amount I want to send followed by six zeros) in this field.
The decimals of your token were set when you created it. If you set it with five decimals, then you add five zeros, if you set it with seven decimals, then you add seven zeros to the amount you want to send, and so on.
Last but not least, the third box is where we paste our wallet hit list — the one we prepped in Step 1. A heads-up here: if your list has more than 500 wallets, it’s better to break it into smaller parts and airdrop less than 500 wallets at a time so that you don’t hit any storage limits* that would cause the whole batch to fail.
*Tezos, like many other blockchains, has a limit on how much storage and gas you can spend per operation and block so that the network nodes can process transactions and communicate fast enough. Storage costs are related to the size of the data that we store on the Tezos blockchain and the more we store, the higher the fees get.
Once we have filled everything, we click the “Prepare” button, and the page should look something like this:
Step 3 - Sending the airdrop #
Alright, we’re almost done! Before we proceed, let’s meticulously review all the details one last time — the token contract address, the amount to be distributed, and the list of wallets. If it all checks out, it’s time to adopt our best Oprah impression and press the “Send Tokens” button. This action triggers a confirmation prompt from our wallet, and upon approval, the tokens will be dispatched.

Do keep in mind, that the cost associated with this batch transfer depends on several factors: the type of token you’re sending (such as a simple FA2 token or an NFT), and the number of wallets you’re targeting. For instance, when I executed my DSB token airdrop to a group of 121 Ottez Gen2 holders, the total cost amounted to 2.14 tez.
And there you have it — a step-by-step guide to airdropping your newly minted tokens on Tezos, complete with tools and practical advice to ensure that your token finds its way to the right hands efficiently.
Stay tuned for more insights and guides as we continue to explore the depths of DeFi on Tezos.
Happy airdropping!