How to Build a Voting dApp on Tezos with SmartPy and React - Part 1
In this tutorial, we'll create a simple dApp that will allow our users to vote for their favorite football players of the year.
12 minute read
In this tutorial, we’ll create a simple dApp (Decentralised Application) that will allow our users to vote for their Ballon Tz’or Footballer of the Year 2023.
Here’s a high-level sketch of the architecture of what we’ll be building.
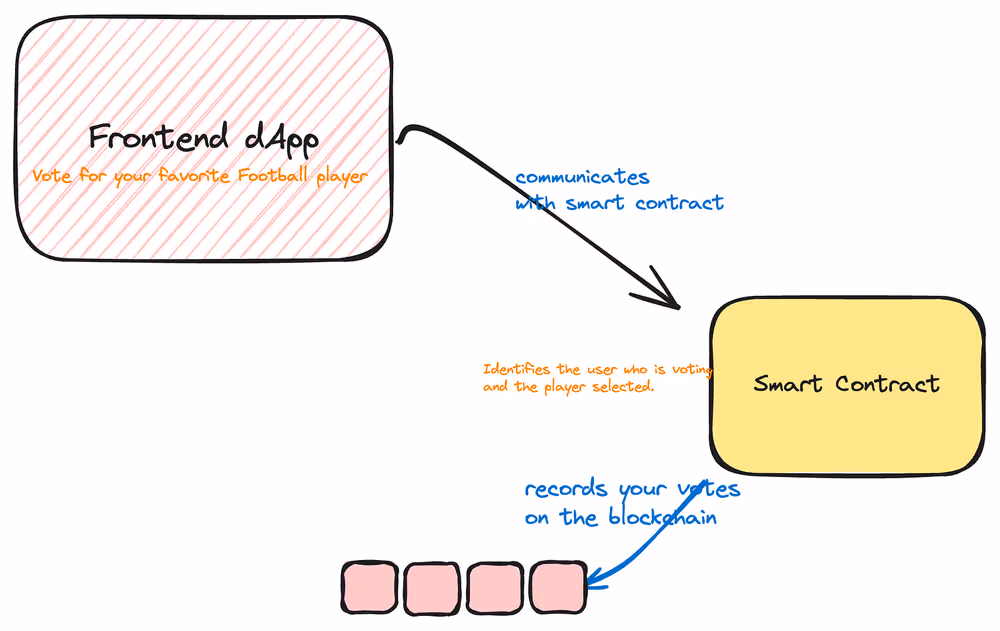
First, we’ll need to Originate (deploy) a smart contract to the Tezos blockchain. If you’re coming from Web2, you can think of a smart contract as some form of a backend/API that handles the logic for your application.
More accurately, Smart Contracts are pieces of code that execute based on pre-determined conditions without the need for 3rd party intervention. For example, suppose you were to buy a digital collectible (NFT), once you make payment for the collectible. In that case, it is immediately transferred to your wallet without the need to inform the producer of the collectible of your payment.
Tezos smart contracts can be written using jsLIGO (a flavor of JavaScript), SmartPy (a library for writing smart contracts in Python), CamelLIGO (a flavor of OCaml), or Archetype. The code you write in these high-level languages is compiled into a language called Michelson which is a low-level language that runs on the Tezos blockchain. In this tutorial, we’ll write our smart contract using SmartPy - if you’re familiar with Python, you should find the SmartPy syntax extremely familiar.
Once our Smart Contract is originated, we’ll then write the Frontend of the application in React.
TL;DR #
See the full smart contract code here
Setting up SmartPy #
To keep this tutorial simple, we’ll be using the SmartPy IDE for development. You can learn more about setting up a local SmartPy environment.
Writing our Smart Contract #
Let’s get into writing our smart contract.
We want our smart contract to do three things;
- Identify the user who is casting a vote - using their wallet address
- Check if the user has previously cast a vote. If they have, stop the execution and return an error. If they haven’t, the smart contract will be executed to completion.
- Update the storage on the blockchain to reflect the new state of the data.
In Smart contract programming, storage refers to the long-term memory of a smart contract i.e. it holds the state of the smart contract. In Web2, data is usually stored on a Database or file system. In Web3, a Smart contract’s code and data are stored on a blockchain.
Instantiating the Contract #
First, we’ll import the smartpy module in our code editor.
import smartpy as sp
Next, we’ll define the Voting class that inherits from the Contractclass in SmartPy giving us access to all of the storage initialization, entrypoints, and internal methods of Contract.
@sp.module
def main():
  class Voting(sp.Contract):
We then define an initialization method. This method initializes the contract’s storage/memory with the values assigned when the contract is originated.
@sp.module

  class Voting(sp.Contract):
      def __init__(self, players, votersWalletAddresses):
        sp.cast(votersWalletAddresses, sp.set[sp.address])
        self.data.players = players
        self.data.votersWalletAddresses = votersWalletAddresses
self is a reference to the current instance of the contract and is ALWAYS the first argument of any method/entrypoint in the contract.
First, wecast the initial value of votersWalletAddresses to a set of address . We’re using the smartPy module to ensure that the type of data we get when votersWalletAddressesis initialized is a setof valid wallet addresses. smartPy has its own special list of types. Refer to the SmartPy docs to learn more.
In Smart contract programming, once your contract is deployed on the blockchain, you cannot edit it or fix any errors. This means ensuring your code works as expected by having test cases, using types etc is a great way to safeguard your contract against malicious use. More on this in the Testing section later on.
Now, let’s improve our code to define the typings for players.
@sp.module
def main():
  players_type: type = sp.map[
                    sp.int,
                    sp.record(
                        name = sp.string,
                        year = sp.string,
                        votes = sp.nat
                    )
                ]

  class Voting(sp.Contract):
      def __init__(self, players, votersWalletAddresses):
        sp.cast(votersWalletAddresses, sp.set[sp.address])
        self.data.players = sp.cast(players,players_type)
        self.data.votersWalletAddresses = votersWalletAddresses
        self.data.dummy = ""
We’ve improved our code to reduce the chances of errors. We have defined all our types beforehand to make sure all the data types the contract receives match what is expected.
Afterward, we initialize the storage self.data.votersWalletAddressesandself.data.playerswith two parameters players and votersWalletAddresses respectively.
self.data.playerswith the parameterplayers. We will pass a list of the names of all the players shortlisted for the Ballon tz’or 2023, and the no. of votes they have received from the users of our application.self.data.votersWalletAddresseswith the parametervotersWalletAddresses.self.data.dummy— will hold an empty string. In the next tutorial where we integrate our dApp with our smart contract, you may notice that having just one entrypoint makes Taquito not recognise your entrypoint. As such, we’ll have adummyentrypoint anddummyvariable that do nothing but keep things moving along smoothly.
Although Python itself avoids explicit type definitions — which makes it not so great for Smart Contract development, the SmartPy team chose it as the language to build off because of its popularity and ease of use.
With our storage initialized, let’s get into the rest of our Voting Smart Contract.
Voting Entrypoint Logic
Now, let’s get into the logic for our contract. We’ll write the code that registers the vote for a player.
We’ll do 3 things
- Check if the user has voted previously using the voter’s wallet address.
- Check if the playerID being passed as a parameter is valid.
- Cast the vote. Then, update the storage with the new value of the votes and the walletAddress of the user who cast the vote.
@sp.entrypoint
def increase_votes(self,params):
    assert not self.data.votersWalletAddresses.contains(sp.sender), "YouAlreadyVoted"
    assert self.data.players.contains(params.playerId), "PlayerIDNotFound"
    self.data.players[params.playerId].votes += 1
    self.data.votersWalletAddresses.add(sp.sender)

@sp.entrypoint
def dummy(self):
  self.data.dummy=""
Now, let’s walk through the code above.
- We have an entrypoint called
increase_votes. Entrypoints are the methods in your code that can be called externally by a dApp or another smart contract. They’re denoted by using the@sp.entrypointdecorator. - We call the
assertkeyword — from Python — to check if thevotersWalletAddressesset already contains the address of the user signing/making the transaction i.esp.sender. We repeat the same thing forplayerID. - Finally, we update the
votesfor the players and update thevotersWalletAddresseslist.
Tests
As mentioned earlier, tests are vital in smart contract development. SmartPy has its own methods of writing tests to ensure that your smart contract behaves as expected.
Also, the test script initializes the storage on the blockchain with the data you pass to it.
@sp.add_test(name="Voting")
def test():
    alice = sp.test_account("alice")
    bob = sp.test_account("bob")
    charlie = sp.test_account("charlie")
    adebola = sp.test_account("adebola")
    scenario = sp.test_scenario(main)
    players = {
        1: sp.record(name="Lionel Messi", year="2023", votes=0),
        2: sp.record(name="Erling Haaland", year="2023", votes=0),
        3: sp.record(name="Kylian Mbappe", year="2023", votes=0),
        4: sp.record(name="Sadio Mane", year="2023", votes=0),
        5: sp.record(name="Cristiano Ronaldo", year="2023", votes=0),
    }

    contract = main.Voting(players, sp.set([alice.address]))
    scenario += contract

    # Scenario 1: Increase votes when playerId Exists
    contract.increase_votes(playerId=2).run(sender=bob.address)
    scenario.verify(contract.data.players[2].votes == 1)

    # Scenario 2: Increase votes when playerId Exists
    contract.increase_votes(playerId=2).run(sender=charlie.address)
    scenario.verify(contract.data.players[2].votes == 2)

    # Scenario 3: Fail if User already voted
    contract.increase_votes(playerId=2).run(
        sender=charlie, valid=False, exception="YouAlreadyVoted"
    )

    # Scenario 4: Fail if playerID does not exist
    contract.increase_votes(playerId=6).run(
        sender=adebola, valid=False, exception="PlayerIDNotFound"
    )
We use the @sp.test decorator provided by smartPy to indicate that the method is a test. We initialize a couple of test_accounts with alice and bob . You can use any name for this — Alice and Bob are the most commonly used profiles in Web3. The test_account method allows us to access things like walletAddress on the account rather than thinking up a walletAddress on our own to use when testing.
Now, we can simply hit the run (play) button in the IDE to check that our code runs correctly. Look to the right of your screen; you should see results like the one below.
A successful vote 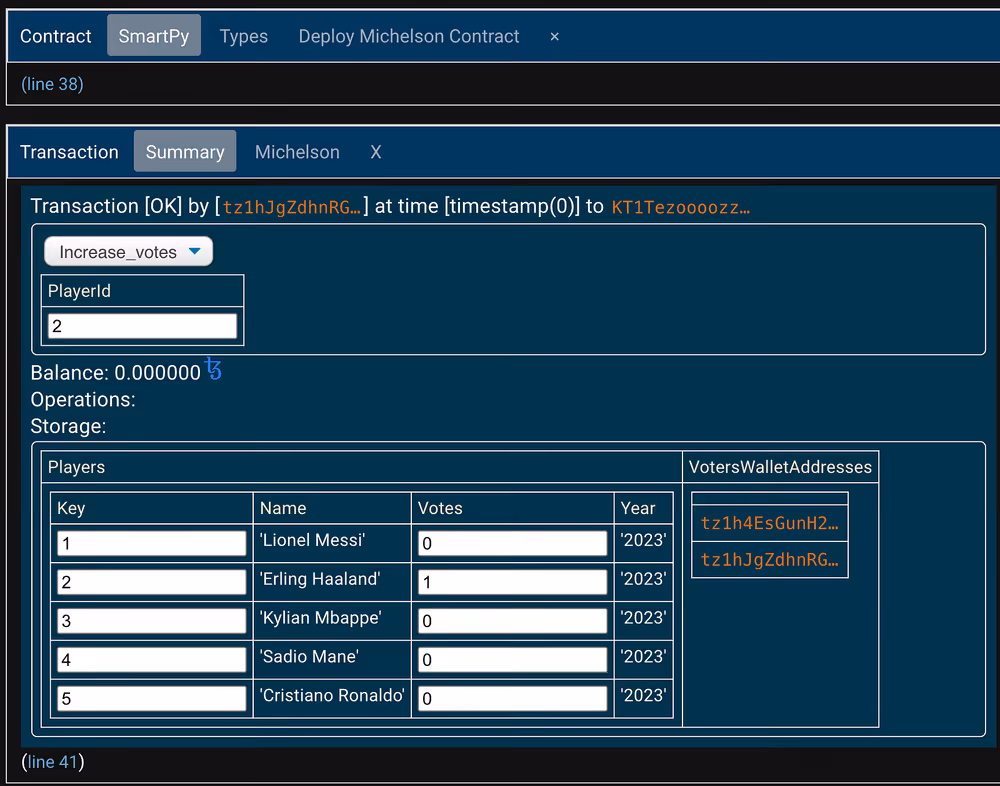
A failed vote 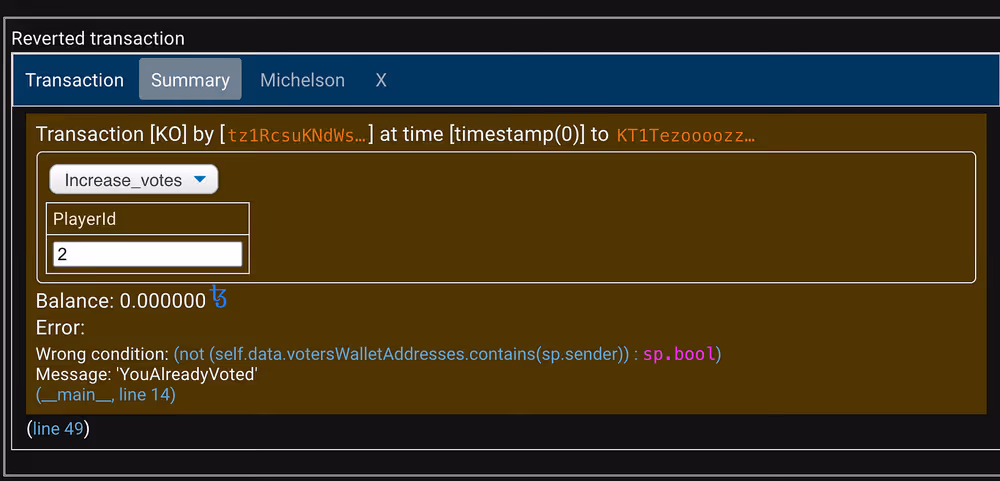
As you can see above (failed vote), if an assertion fails, the entire transaction is reverted and no changes are made to the storage.
Setting up a Wallet
You’ll need a wallet to deploy and run your Smart Contract. Get an XTZ (tez) wallet from Temple. You’ll need some test XTZ to pay gas fees and to successfully originate your smart contract. To get test XTZ, we use a faucet. You can claim some test XTZ sent to your wallet address using the faucet bot on Telegram.
You can also use the Faucet located here to get test tokens.
Originating your Smart Contract
On Tezos, deploying a smart contract to the blockchain is known as origination. To originate your smart contract,
Hit the Deploy Michelson Contract button.
Select the ghostnet as your network of choice. This way we do not need to use real XTZ to pay gas fees.
In the wallet tab, click Select Account. You’ll be connecting your wallet containing test XTZ. We will use the Temple wallet for this tutorial — you’ll need the Temple Chrome extension. Your gas fees will be charged to this wallet. You can get test XTZ to play with from the faucet.
Click Reveal account.
If it’s your first time performing a transaction like deploying a smart contract on the Temple wallet, you’ll need to hit the Reveal Account button first. If you try deploying your contract without revealing your account, you may run into an error.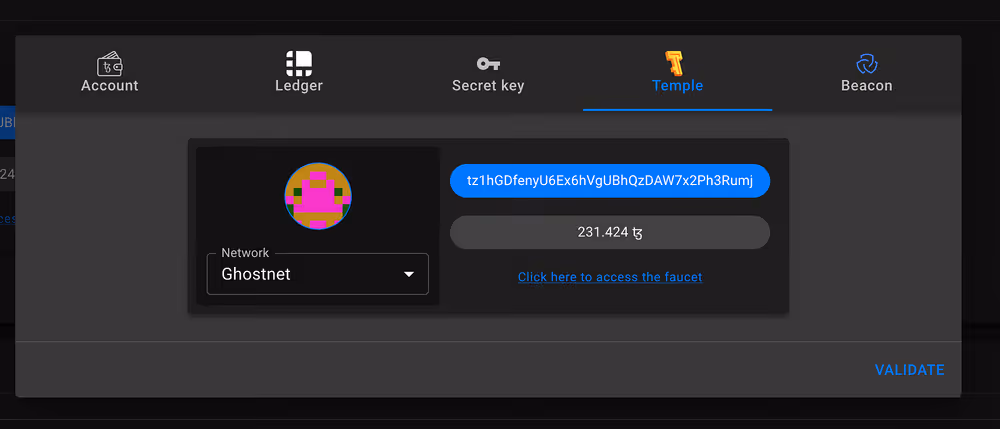
Click Estimate cost from RPC. This will display the maximum amount of storage and gas fees that your operations will use. The storage fee is how much you pay to store data on the chain while the gas fee is the cost to execute your contract on the chain.
Finally, click Deploy Contract at the bottom of the screen. You’ll get a pop-up asking for you to sign the transaction. Click Sign. You should see a green check mark letting you know that your contract was successfully originated. 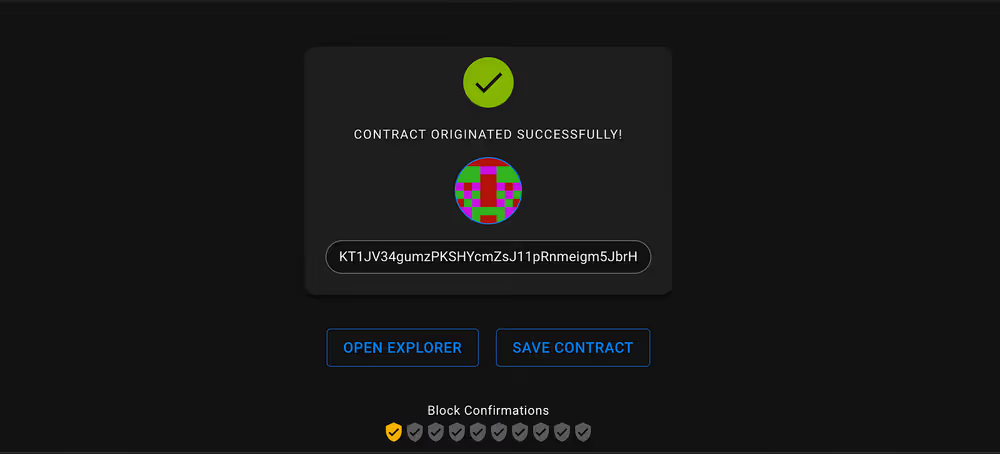
This is a good time to touch on block finality on Tezos.
Block Finality on Tezos
Block Finality is the no. of blocks required and the amount of time it takes to have complete assurance that a transaction cannot be reverted or altered i.e a transaction on the blockchain is complete and all nodes will hold the same copy of the transaction.
On Tezos, block finality is 2 blocks which takes around 30 seconds on the mainnet and 15 seconds on the testnet. This means that in less than 30 seconds, you can be sure that your transaction has been added to the chain and cannot be altered. In contrast, Ethereum has a block finality of 15 mins.
Interacting with a Tezos Smart Contract
To see and interact with your Smart Contract on the blockchain, copy the contract address shown, it starts with KT1... . Next, head to better-call.dev (a smart contract explorer) and paste in your contract address to see more about your contract like below. 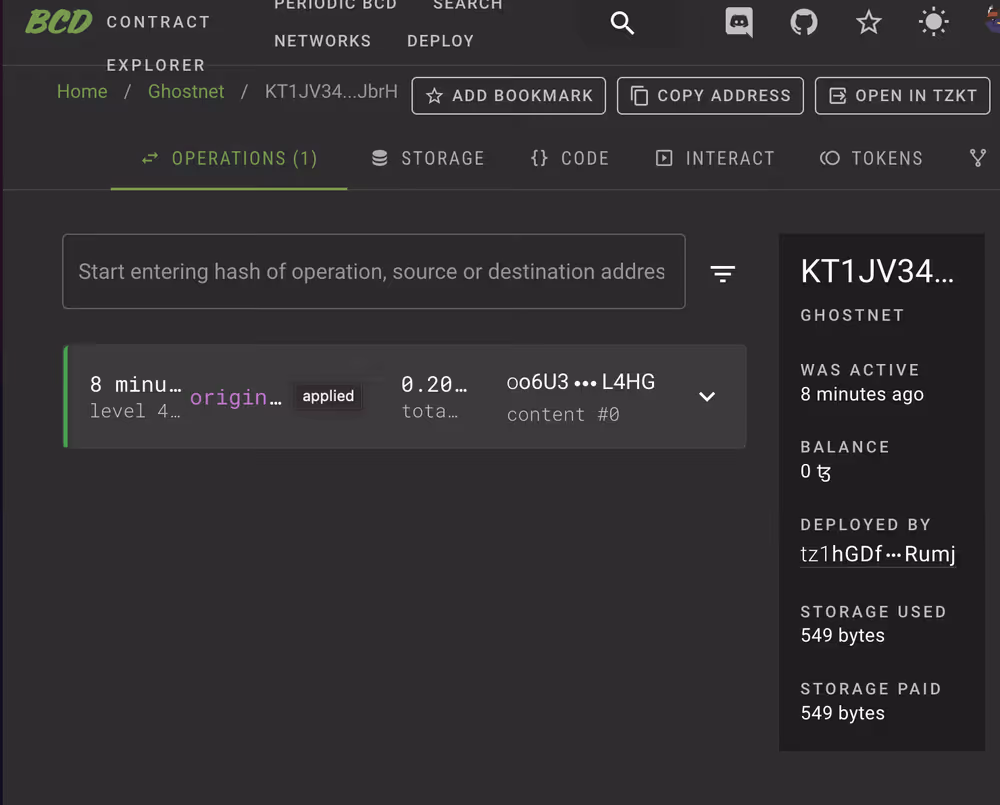
Now, let’s try to vote for a Player using the smart contract we have deployed.
Click Contract Page > Interact to get to the screen where you can interact with the contract. Enter the player_id for the player you’ll like to vote for. If you put any id apart from 1 or 2 , you’ll get an error. 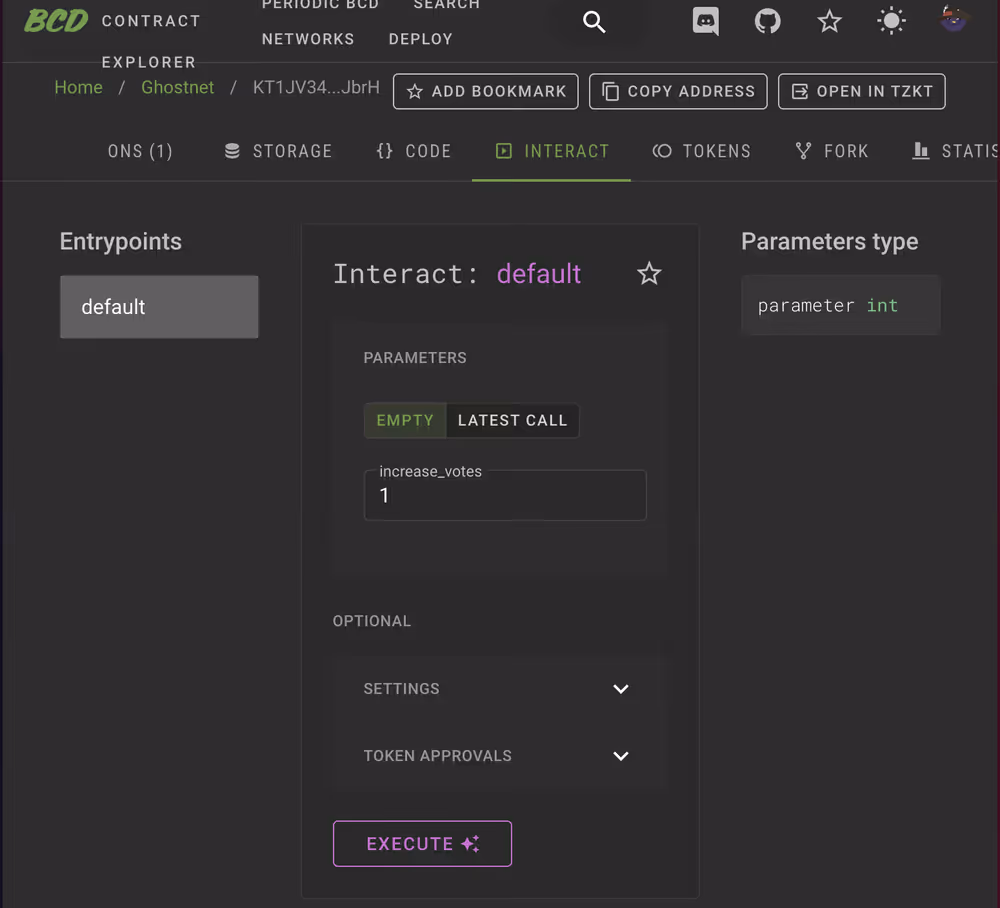
As you can see, we’ve only got one entrypoint we can interact with — increase_votes as this is the only entrypoint we defined in our contract.
Click Execute > Wallet > Select Temple Wallet. Approve the transaction. 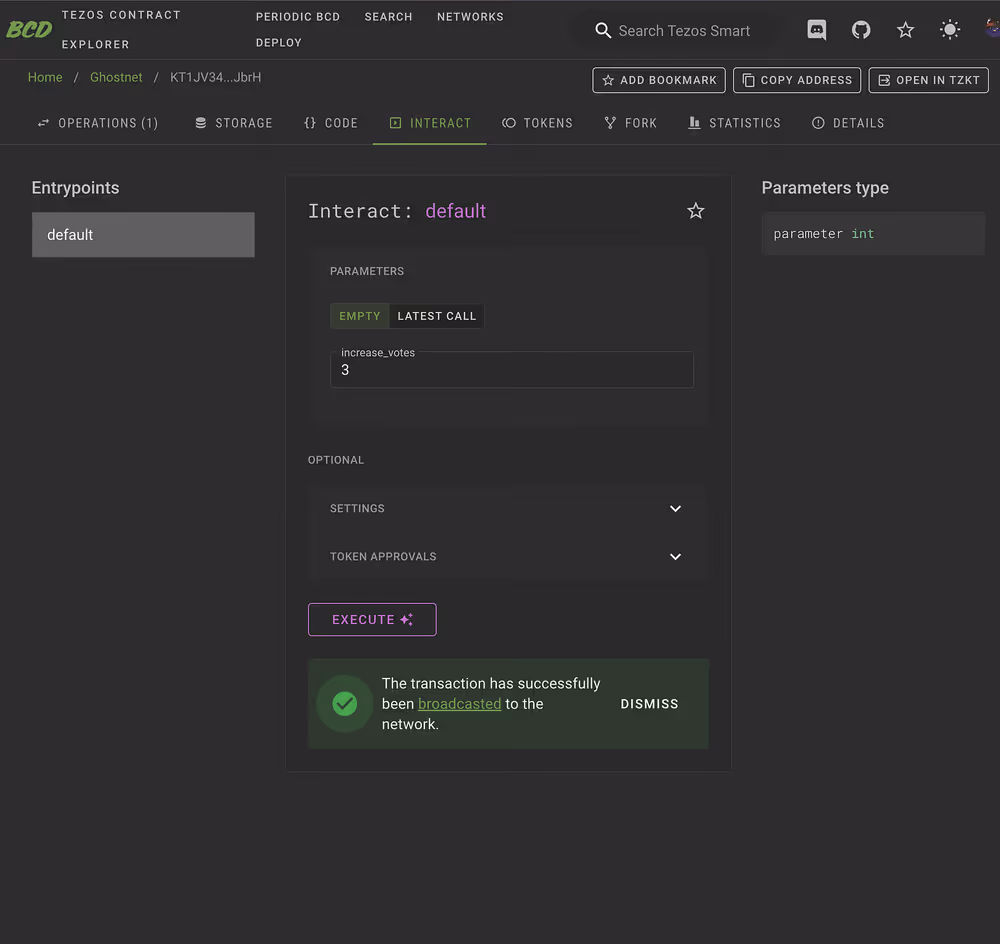
Now, when you go back to Storage, you should see the no. of votes for your selected player_id has increased. 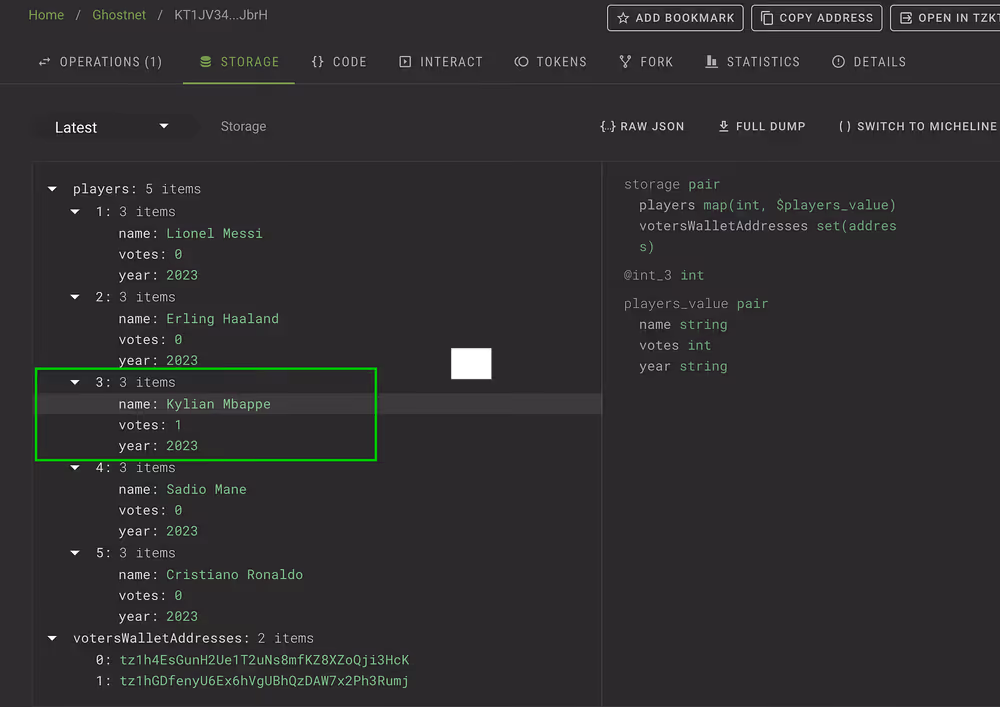
Also, if you try to vote more than once with the same account, the transaction will be invalid.
See the full code for this tutorial here