How to Pay Gas Fees for Users of Your dApp: Meta Transactions on Tezos
This tutorial introduces Meta transactions on Tezos and covers how to use the Marigold Gas Station API to cover gas fees for dApp users.
10 minute read
This tutorial introduces Meta transactions on Tezos and covers how to use the Gas Station API to cover gas fees for dApp users.
To onboard the next billion users on Web3, simplifying user onboarding and improving the user experience of dApps (decentralized applications) is extremely important. For many users, the mindset shift from using Web2 applications to using Web3 dApps can be a steep slope. As such, dApp developers are always on the lookout for new ways to improve the UX for users in a way that abstracts away some of the complexities of using decentralized applications.
One example of a major barrier to onboarding users to a dApp is the need to pay gas fees in order to interact with the dApp. 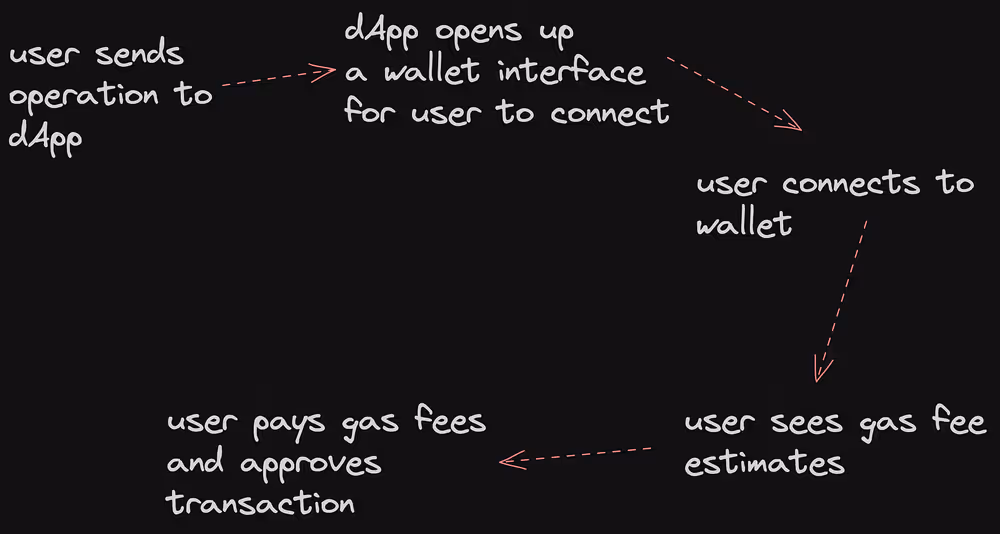
Users of dApps built on Tezos will need to open a wallet and acquire XTZ(tez) in order to start using your dApp which can be a barrier to user onboarding. To get over this barrier, the idea of meta-transactions was developed.
What are Meta Transactions? #
Meta transactions allow dApp developers to improve the user experience of their applications by removing the need for users to hold tokens for paying gas fees. This is done by separating the transaction’s sender (user) from the gas payer. The Gas Payer (usually another smart contract wallet) acts as the relayer for the transaction.
Let’s look at why this is important;
In Web2 for example, an app like Instagram allows users to post pictures to their feed without the need to pay a fee each time they post. Users can also like posts, leave comments, send DMs, and more without the need to pay fees for each operation. Meta transactions allow for Web3 dApps to provide a similar experience to users making dApps more user-friendly and improving the overall experience.
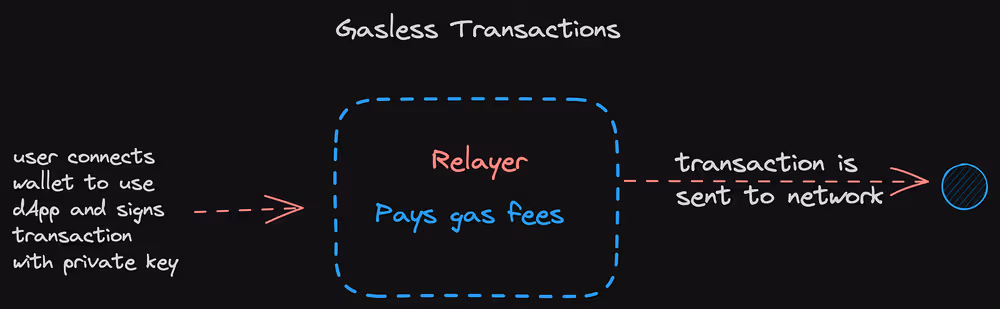
There are 2 types of Meta transactions: Gasless transactions: Gasless or Zero-gas transactions allow users to interact with your dApp without the need to pay gas fees.
Gas Abstraction: Gas abstraction allows users of your dApp to pay gas fees using a token other than the native token of your application. Any token supported by the relayer can be used to cover the gas fees for the transaction.
TZIP-17 and Meta Transactions #
TZIP-17 (the permit proposal) introduced the standard for account abstraction. This standard allows pre-signing - a way to have transactions be signed and submitted separately. Read more here.
TZIP-17 is the standard that allows meta transactions to work on Tezos. With this standard, we can have a relayer submit a user’s pre-signed (meta) transaction and pay the tez fees on their behalf.
Gas Stations Gas stations are a good example of systems that can act as a relayer for transactions on a dApp. A Gas station - as the name implies, is simply a system that allows you to store tez (or any token supported by the station) to be used in paying for gas on behalf of your dApp users.
In the next part of this tutorial, we’ll build a simple dApp that interacts with a Gas Station.
Using the Gas Station API #
With everything we’ve covered in the previous sections, you should now be familiar with these concepts;
- Relayer
- Gas Abstraction
- Gasless transactions
- Meta Transactions
- TZIP-17 proposal
- Gas stations
Now, we’re ready to take all of this knowledge and build something in the wild. We’ll be using the Gas Station API from Marigold to build a simple voting dApp that implements gasless transactions. If you have never built a dApp on Tezos before, follow this tutorial to learn more. We’ll be building on the voting dApp example in that tutorial here.
The full code for the Voting dApp’s front end can be found here.
Let’s get started! Head over to the Marigold Gas Station API environment and connect your wallet to the application using the Connect Wallet button in the top right. Connect your wallet on the Ghostnet network to the application. Next, we’ll need to add credits to the gas station to be used to pay for transactions for users of our dApp. Click on My credits in the menu. You should now be able to see your wallet balance. Enter the amount of tez you’d like to use within the gas station and click Add ꜩ to add the tez to your account. You can get test credits by using a faucet.
Now, we need to make some changes to our Voting Smart Contract for it to still work correctly with our dApp and Gas station. We’ll need to
Do away with
sp.senderbecause the transaction’ssenderwill always be the relayer (Gas Station API). As such, we’d need to get the actualsender/userfrom the transaction parameters - more on this later.Get the transaction’s sender from
paramsinstead. Make the following changes to theincrease_votesentrypoint.
@sp.entrypoint
def increase_votes(self, params):
  assert not self.data.votersWalletAddresses.contains(params.sender), "YouAlreadyVoted"
  assert self.data.players.contains(params.playerId), "PlayerIDNotFound"
  self.data.players[params.playerId].votes += 1
  self.data.votersWalletAddresses.add(params.sender)
We’ll also need to change up our test scenarios to accommodate these changes. Your test scenarios should now look like the below;
# Scenario 1: Increase votes when playerId Exists
    contract.increase_votes(playerId=2, sender=bob.address).run()
    scenario.verify(contract.data.players[2].votes == 1)

    # Scenario 2: Increase votes when playerId Exists
    contract.increase_votes(playerId=2, sender=charlie.address).run()
    scenario.verify(contract.data.players[2].votes == 2)

    # Scenario 3: Fail if User already voted
    contract.increase_votes(playerId=2, sender=charlie.address).run(valid=False, exception="YouAlreadyVoted"
    )

    # Scenario 4: Fail if playerID does not exist
    contract.increase_votes(playerId=6, sender=adebola.address).run(valid=False, exception="PlayerIDNotFound")
Now, go ahead to deploy your smart contract.
See the full code for the updated smart contract here.
Connecting your Smart Contract to the Gas Station #
Back in the Gas Station UI, navigate to contracts in the menu. Copy and paste your smart contract address in, then click fetch entrypoints. Give your contract a name you can easily remember.
Now, you can toggle on the entrypoints you’ll like to use with the Gas Station API. For this example, we’ll only use the increase_votes entrypoint. 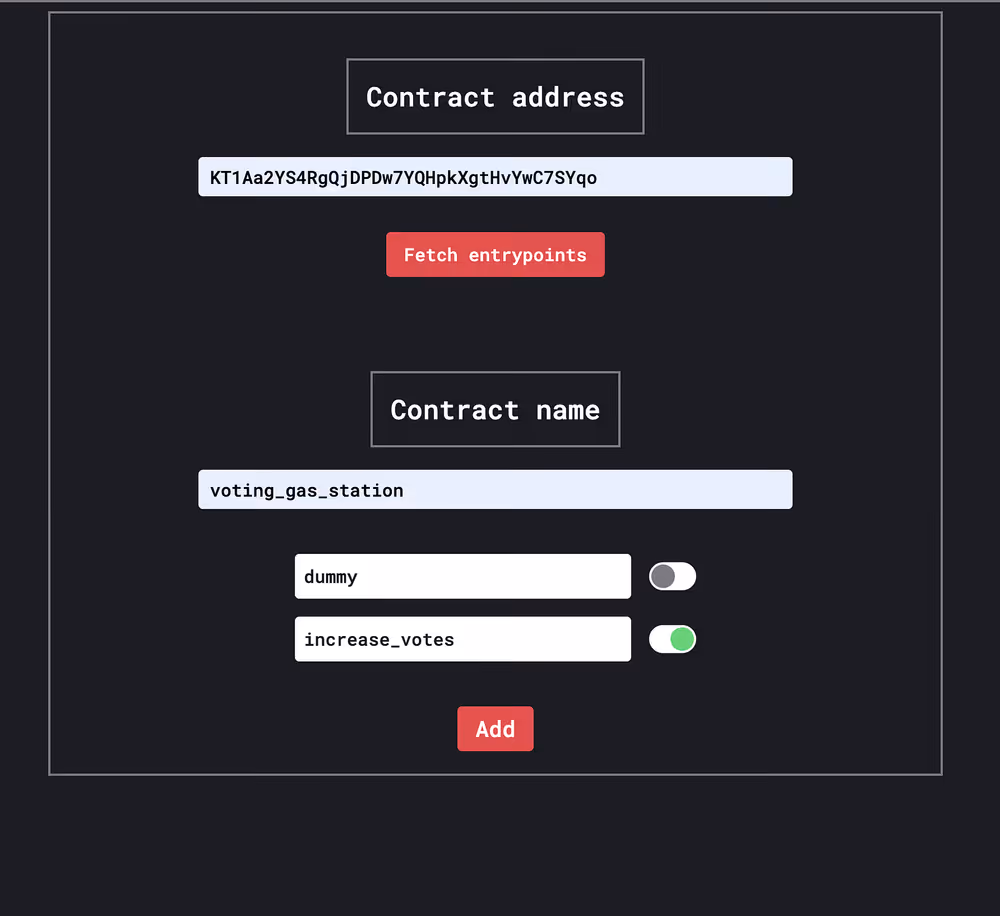 Click Add.
Connecting the Frontend to the Gas Station #
With our Smart contract deployed, let’s head to our application’s Frontend to make some changes. The original code for this application is here. We’ll be modifying the following files; src/pages/index.js and src/helpers/constants.js . We’ll also be installing Axios which will allow us to connect to APIs/endpoints like the Gas station API that exists outside our application.
Let’s install axios.
npm i axios
Next, update the src/helpers/constants.js file. We’ll need to update the CONTRACT_ADDRESS and GAS_STATION_API_URL
const CONTRACT_ADDRESS = "KT1Aa2YS4RgQjDPDw7YQHpkXgtHvYwC7SYqo";
const GAS_STATION_API_URL = "https://gas-station-api.gcp-npr.marigold.dev";
Don’t forget to also export GAS_STATION_API_URL Next, head into src/pages/index.js.
Import the GAS_STATION_URL with the rest of your constants like below;
import {
  CONTRACT_ADDRESS,
  RPC_URL,
  GAS_STATION_API_URL,
} from "@/helpers/constants";
We’ll also need to keep tabs on the User’s Wallet Address userAddress so we can send this alongside the rest of the transaction parameters to the API. To do that, we’ll use React’s useState hook. Your hooks section should now look like below with const [userAddress, setUserAddress] = useState(null) added.
  const [players, setPlayers] = useState([]);
  const [reload, setReload] = useState(false);
  const [message, setMessage] = useState("");
  const [userAddress, setUserAddress] = useState(null);
Now, we’ll update our connectWallet function to store the userAddress state
  const connectWallet = async () => {
    setMessage("");
    try {
      const options = {
        name: "Ballon tz'or",
        network: { type: "ghostnet" },
      };
      const wallet = new BeaconWallet(options);
      walletRef.current = wallet;
      await wallet.requestPermissions();
      Tezos.setProvider({ wallet: walletRef.current });
      const userWalletAddress = await wallet.getPKH();
      setUserAddress(userWalletAddress);
    } catch (error) {
      console.error(error);
      setMessage(error.message);
    }
  };
We’ll also create a button for the user to connect their wallet when the application loads. This button will run the connectWallet function when clicked. This allows us to make sure we have stored the userAddress before we attempt to send a transaction.
 <button
        className="mt-4 rounded-full bg-green-500 p-3 hover:bg-green-700 transition-all ease-in-out"
        onClick={() => connectWallet()}
      >
        Connect Wallet
</button>
Finally, we’ll add a callGasStation function to replace our votePlayer function. i.e when a user clicks on Vote, our dApp will call callGasStation instead of votePlayer You’ll notice that the callGasStation function bypasses the need to have the user’s wallet load up, show them the gas fees and have them approve and sign the transaction. Instead, all of that is handled by the gas station (relayer).
  const callGasStation = async (playerId) => {
    try {
      console.log("in call Gas station");
      const contract = await Tezos.wallet.at(CONTRACT_ADDRESS);
      const op = await contract.methods
        .increase_votes(playerId, userAddress)
        .toTransferParams();

      console.log("address", userAddress);

      const response = await axios.post(GAS_STATION_API_URL + "/operation", {
        sender: userAddress,
        operations: [{ destination: op.to, parameters: op.parameter }],
      });
      console.log("Gas Station response:", response.data);
    } catch (error) {
      console.log(error.message);
      setMessage(error.message)
    }
  };
Let’s walk through the code snippet above;
We connect to the contract using Taquito as usual.
 const contract = await Tezos.wallet.at(CONTRACT_ADDRESS);
 const op = await contract.methods
        .increase_votes(playerId, userAddress)
        .toTransferParams();
We tap into the increase_votes entrypoint that has been updated to take 2 parameters of playerId and sender - which is the userAddress . Then, we call the toTransferParams() method on it in order for us to access the operations object returned by the method. The operations object contains a number of objects including the to and parameter which we make use of when calling the Gas Station API.
You can find out what the parameters expected by the Gas Station API are by reading the Swagger Docs/API documentation here. From the docs, we can see that the /operation API expects a JSON object of sender and operation in the form below;
{
  "sender": "string",
  "operations": [
    {}
  ]
}
So, we pass userAddress and the values obtained from op to the API.
 const response = await axios.post(GAS_STATION_API_URL + "/operation", {
        sender: userAddress,
        operations: [{ destination: op.to, parameters: op.parameter }],
   });
See the full code here.
Now, we can run our application to check that everything works correctly.
We can also head to a smart contract explorer like BetterCallDev to check that our smart contract works correctly. For the smart contract used in this example, you can see use the BCD explorer to see how it works.