How to Build a MultiSig Smart Contract on Tezos | Part 1
Learn how Tezos MultiSigs work and dive into writing a MultiSig smart contract in part one of this 2-part tutorial.
7 minute read
What are MultiSigs? #
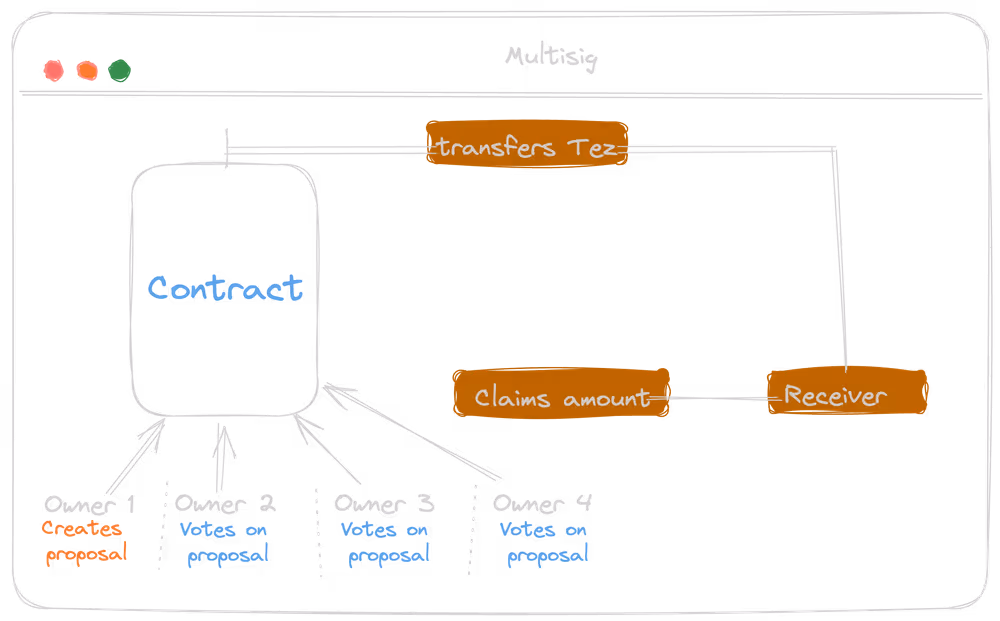
MultiSigs (short for multi-signature) is a wallet/smart contract that requires multiple private keys to authorize a transaction. In other words, for funds to be moved from the wallet, the participants must agree by signing the transaction with their private keys. The minimal number of participants that need to agree for the action to be approved is called the multisig threshold. You may also see this being referred to as a Quorum.
You can picture this as a joined account at a Bank or a treasury requiring multiple signatures before funds can be disbursed out of the account.
Some use-cases of MultiSigs #
Governance: Multi-sig contracts are a great way for DAOs(Decentralized autonomous organizations) to manage their treasury (i.e funds owned by the organization and not by an individual).
Security: Multisigs can help secure funds by requiring the signature of multiple participants before a transaction can be approved. For example, if an attacker gains an account’s private keys, they can steal the account’s tokens. However, if tokens are stored in a multisig, one compromised account is not enough to steal them.
In fact, some cryptocurrency exchanges use multisig contracts to protect the funds in their cold storage wallets.
- Escrow: Multisigs can hold funds in trust for two parties until the terms of a transaction are met.
Writing a MultiSig Smart Contract #
In this tutorial, we’ll write a MultiSig contract that;
- Stores the wallet addresses of all 4 participants in the contract
- Has a
depositentrypoint that allows each participant to fund the contract - Has a
submit_proposalentrypoint that allows each participant submit a proposal/request to send funds to a wallet address. - Has a
vote_on_proposalentrypoint that allows each participant vote on a proposal.
First, we’ll define the proposal_type. This type represents a proposal to send a certain amount of funds to a certain account. By defining the type, we can prevent invalid proposals from being sent to our contract.
import smartpy as sp

@sp.module
def main():
    proposal_type:type = sp.big_map[
        sp.int,
        sp.record(
            paymentAmt = sp.mutez,
            receiver=sp.address,
            voters = sp.set[sp.address],
            votingComplete = sp.bool
        )
    ]
The proposal_type is a big_map of all of the proposals, indexed by an integer key. Each proposal includes an amount to be paid, the account to receive the funds, and a list of accounts that voted in favor of the proposal. This contract doesn’t have a way to vote against the proposal, so accounts that are against the proposal simply abstain.
Next, we’ll define the class and also define the__init__ method, which creates a new object from the class. This method initializes the storage with an empty list of proposals. It also stores the members of the contract and the number of votes required to approve a proposal, both of which cannot be changed.
    class MultiSigContract(sp.Contract):
        def __init__(self, members, requiredVotes):
            # Keep track of all the proposals submitted to the multisig
            self.data.proposals = sp.cast(sp.big_map(), proposal_type)
            self.data.activeProposalId = 0
            self.data.members = sp.cast(members, sp.set[sp.address])
            self.data.requiredVotes = sp.cast(requiredVotes, sp.nat)
Now, let’s define our deposit entrypoint. This is the entrypoint that allows for funds to be deposited into the contract. The only check we perform here is to check that the depositor is a member of the multisig before allowing the funds to be deposited.
        @sp.entrypoint
        def deposit(self):
            assert self.data.members.contains(sp.sender), 'Not a Member of MultiSig'
The next step is to define our submit_proposal entrypoint. This entrypoint allows members of the multisig to submit a proposal for other members to vote on. Note that the submitter must be a member but the receiver does not need to be a member.
        @sp.entrypoint
        def submit_proposal(self, params):
            """
            Submit a new proposal for members
            of the MultiSig to vote for.
            """
            assert self.data.members.contains(sp.sender), 'Not a Member of MultiSig'
            assert params.paymentAmt <= sp.balance, 'The MultiSig does not have enough funds for this proposal'
            self.data.activeProposalId += 1 # submitting a new proposal inactivates the last one
            self.data.proposals[self.data.activeProposalId]=sp.record(
                paymentAmt=params.paymentAmt,
                receiver=params.receiver,
                voters=sp.set(sp.sender),
                votingComplete = False
            )
Lastly, we allow members to vote on the proposal using the submit_proposal entrypoint.
        @sp.entrypoint
        def vote_on_proposal(self):
            assert self.data.members.contains(sp.sender), 'Not a Member of MultiSig'
            # check if the user has previously voted on the proposal
            assert not self.data.proposals[self.data.activeProposalId].voters.contains(sp.sender), "Member has voted on this proposal"
            self.data.proposals[self.data.activeProposalId].voters.add(sp.sender)
            if sp.len(self.data.proposals[self.data.activeProposalId].voters) == self.data.requiredVotes:
                sp.send(self.data.proposals[self.data.activeProposalId].receiver, self.data.proposals[self.data.activeProposalId].paymentAmt)
            self.data.proposals[self.data.activeProposalId].votingComplete = True
Once the no. of required votes is reached, the proposedAmt is sent to the receiver’s wallet address.
With our entrypoints written, we can move on to writing our tests.
@sp.add_test(name="Multisig")
def test():
    scenario = sp.test_scenario(main)
    alice = sp.test_account('alice')
    bob = sp.test_account('bob')
    charlie = sp.test_account('charlie')
    dani = sp.test_account('dani')
    earl = sp.test_account('earl')
    scenario.h3("MultiSig Proposal Contract")
    members = sp.set([alice.address, bob.address, charlie.address, earl.address])

    contract = main.MultiSigContract(members, 3)
    scenario += contract

    scenario.h3("Members can add funds to the contract")
    contract.deposit().run(sender=alice.address, amount=sp.tez(50))

    scenario.h3("Members can submit a proposal for funds to be sent to an address - Proposal 1.")
    contract.submit_proposal(sp.record(paymentAmt=sp.tez(30), receiver=dani.address)).run(sender=alice.address)

    scenario.h3('Non-members cannot vote on proposals')
    contract.vote_on_proposal().run(valid=False, sender = dani.address)

    scenario.h3('Member 2 can vote on proposal')
    contract.vote_on_proposal().run(sender = bob.address)

    scenario.h3('Member 3 can vote on proposal')
    contract.vote_on_proposal().run(sender = charlie.address)

    scenario.h3('Contract balance should drop to 20tez after transfer')
    scenario.verify(contract.balance == sp.tez(20))

    scenario.h3("A New proposal can be created")
    contract.submit_proposal(sp.record(paymentAmt=sp.tez(20), receiver=dani.address)).run(sender=alice.address)

    scenario.h3("New proposal can be voted on")
    contract.vote_on_proposal().run(sender = charlie.address)
To test that everything works correctly, hit the run button at the top of the SmartPy IDE. You’ll see a log displayed to the right of your screen with details of the smart contract execution like below;

The logs show:
- The entrypoint being called e.g
submit_proposal - The parameters passed to the entrypoint e.g
paymentAmtandreceiver. - The balance in the contract
- The operations being run by the contract; for example transferring tez to a wallet address.
- Contents of the contract’s storage.
Once we confirm that our tests run correctly, we can go ahead to deploy our contract to the ghostnet and test the entrypoints from a smart contract explorer’s UI like Better call dev.
Find the smart contract for this MultiSig here.