How to stake your tez and earn 2x rewards
This step-by-step tutorial takes you through the process of staking tez via the staking app at stake.tezos.com
1,250 words, 7 minute read

NOTE: Following the Quebec protocol upgrade, staking rewards are now 3x delegation rewards. Check out this blog post for more information.
Staking and delegation are two different actions within the Tezos Proof-of-Stake mechanism, but you’d be forgiven for confusing the two. Both ultimately serve the same purpose (securing the network), but they have different implications for end-users and bakers.
For a detailed description of all the implications of each option to both end-users and bakers, check out this in-depth explainer.
In this post, you’ll learn the key differences between staking and delegating tez from a user perspective – and how to stake using the Tezos staking app interface.
What’s the difference between staking and delegating? #
While delegation has been around since the beginning, staking is a new option, brought about with the release of adaptive issuance after the rollout of the Paris protocol upgrade.
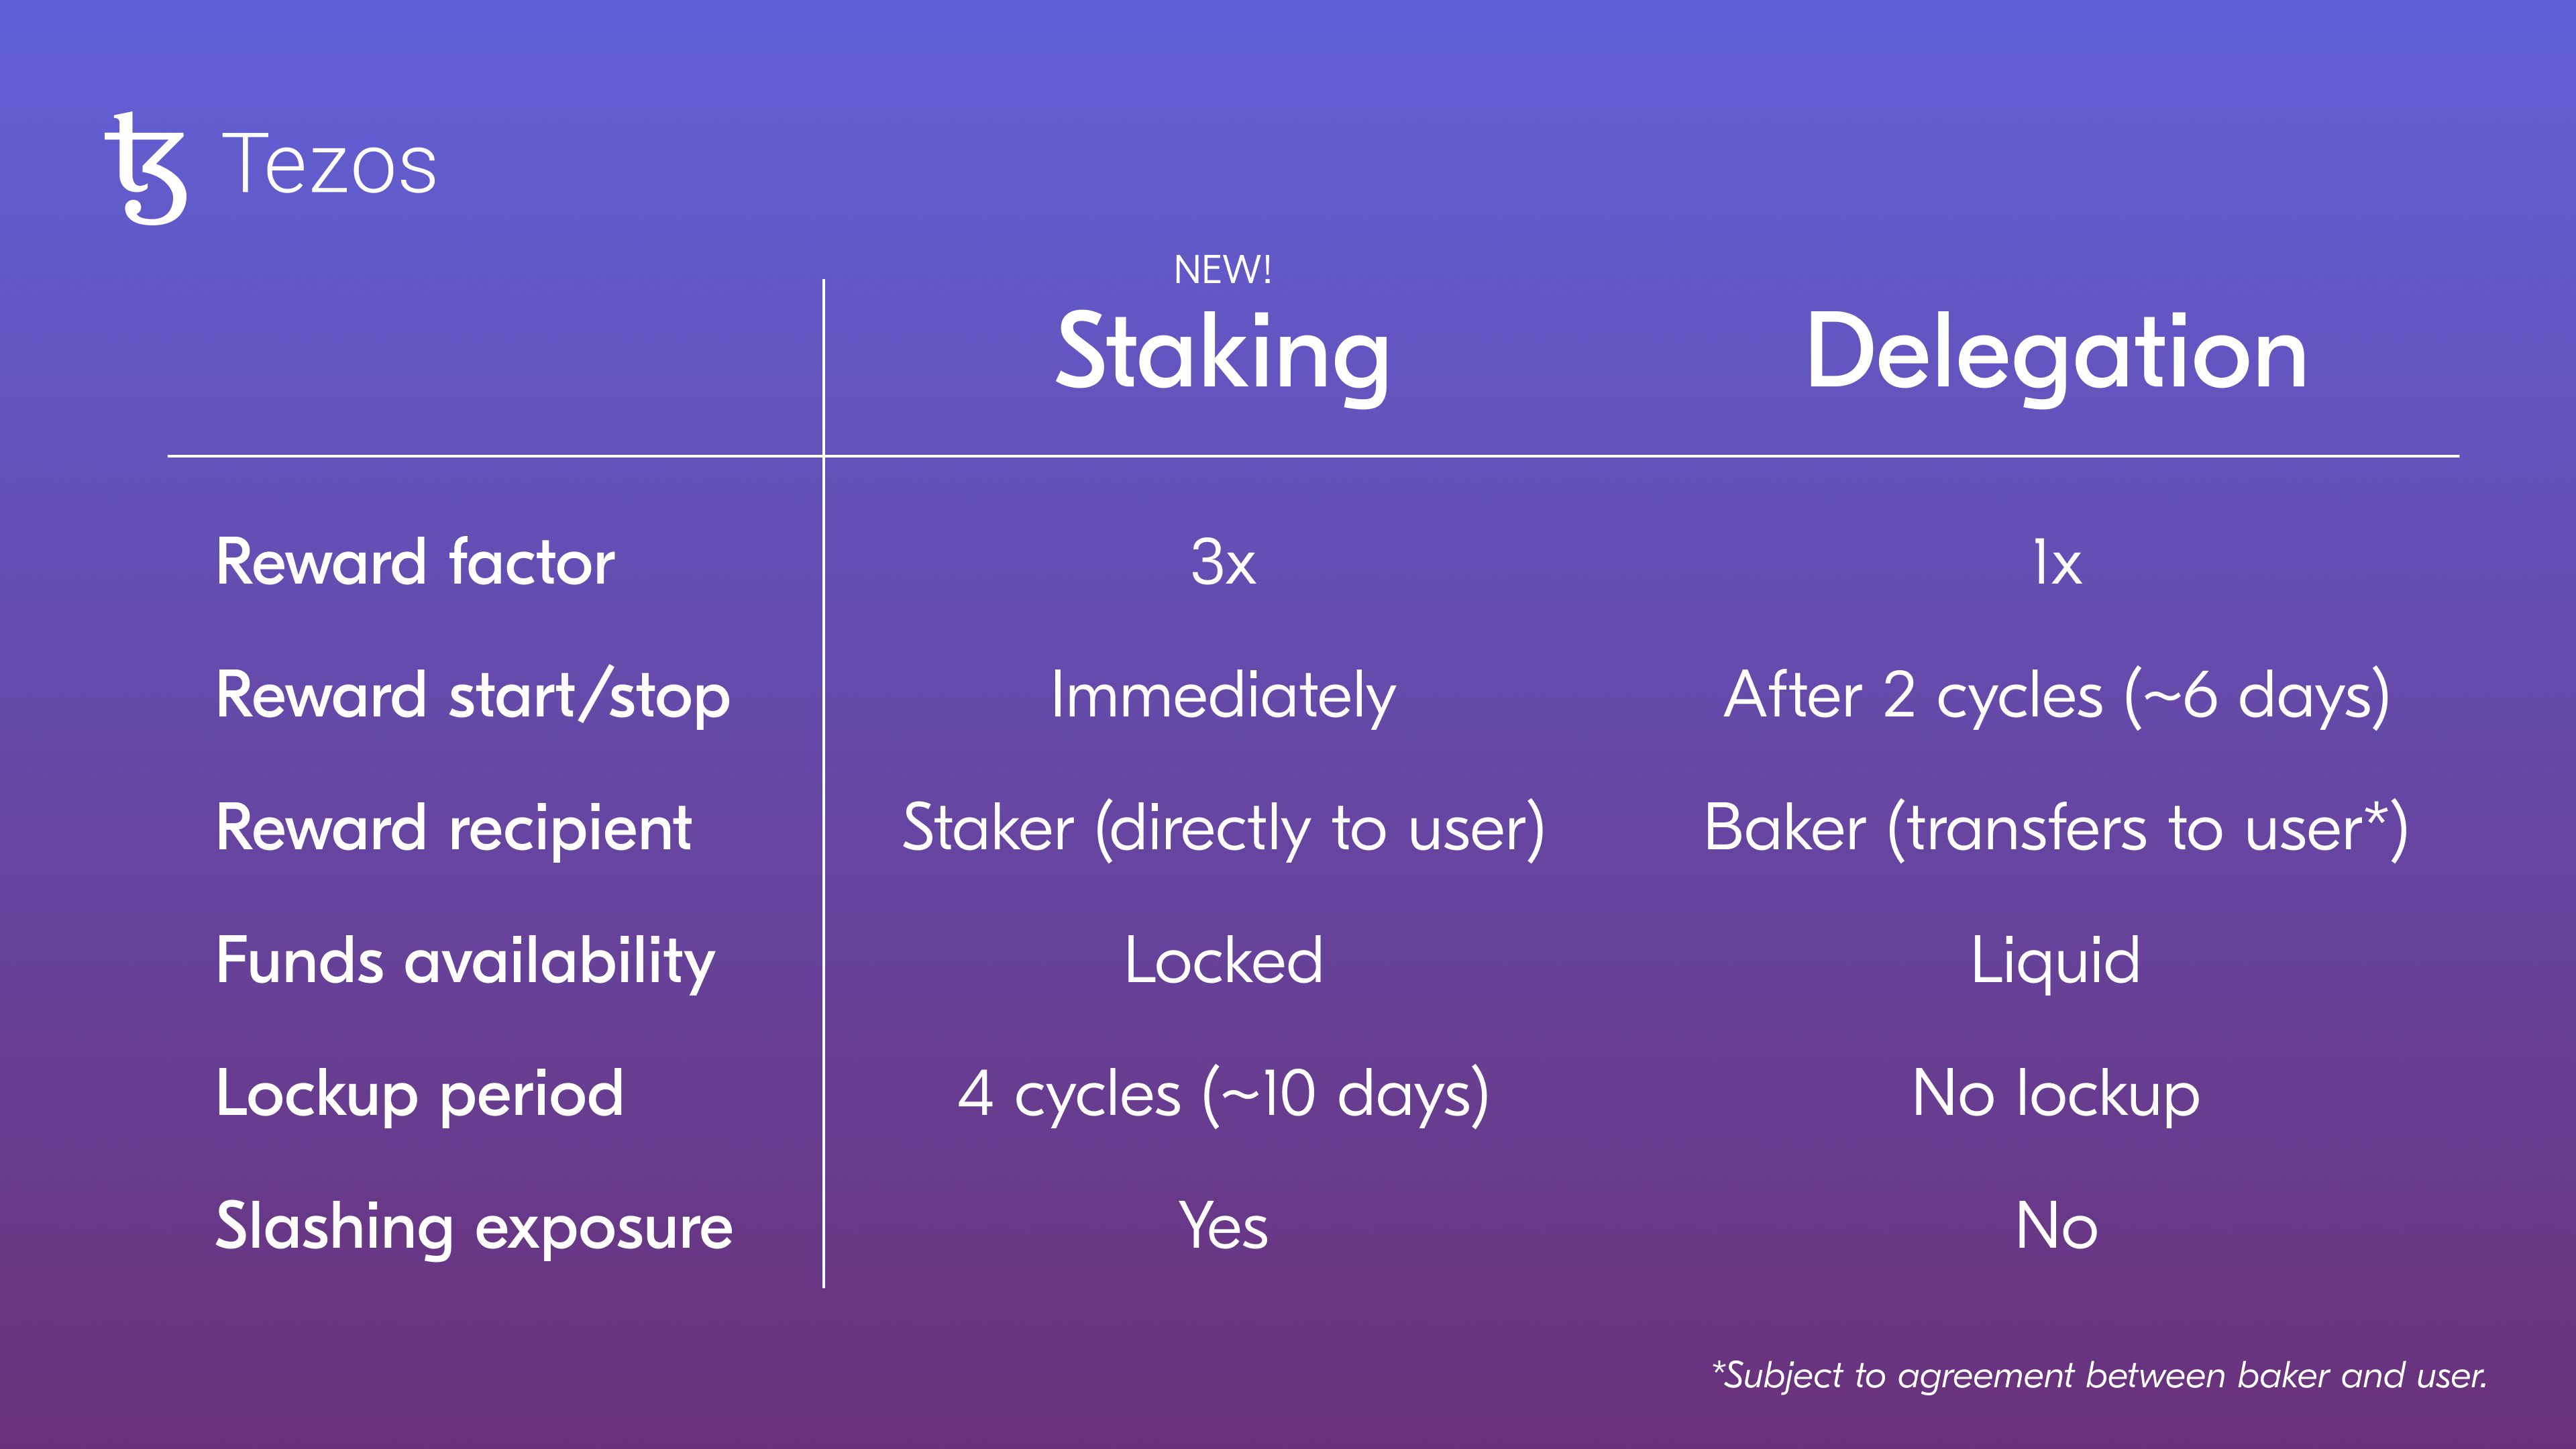
From a user perspective, the main differences between staking and delegating fall within the following categories:

- Rewards factor: both delegated and staked funds accrue rewards proportional to their share of the baker’s staking power. However, staked funds endow double the rewards than delegated funds (before baker fees).
- Rewards start/stop: how long rewards take to start or stop accruing after delegating/staking or undelegating/unstaking.
- Rewards recipient: the account into which rewards are minted. Rewards from staking are minted directly into your account, while rewards from delegated tokens go to the baker (who must then transfer them to you).
- Funds availability: the ability to immediately dispose of the delegated/staked tez tokens. Regardless of whether they’re delegated or staked, tokens never leave the user’s account;
- Lockup period: how long your staked funds remain frozen if you decide to unstake them.
- Slashing exposure: whether or not user funds are subject to penalties in case of misbehavior by the chosen baker. In practice, slashing events are very rare, and even if/when they happen, they would usually amount to a small proportion of staked funds.
How to stake your tez #
This guide will take you through the staking process using the Tezos staking app interface. We recommend using a laptop or desktop computer.
Before you start, make sure you have tez tokens in a supported wallet such as Kukai, Temple, Trust Wallet, or Umami Wallet.
In the future, wallets may support staking directly from within their interfaces. If your preferred wallet doesn’t yet support it, please let us know.
Make sure you are in the right URL (stake.tezos.com) and do not trust unknown websites asking you to sign transactions. Finally, never give your private seed phrase to anyone.
Getting started #
In a nutshell, here’s what you need to do:
- Connect your wallet to the staking app
- Delegate your tez to a baker of your choosing
- Stake your delegated tez
Let’s go through each step in more detail.
1. Connecting your wallet #
 To get started, head to stake.tezos.com and click Connect your wallet.
 Select your wallet and your preferred connection method.
 When prompted, unlock your wallet and confirm the connection to continue.
2. Delegating tez to a baker #
In order to stake, you first need to delegate your tez to a baker if you’re not yet delegating.
If you’re already delegating to a baker, you need to check that your delegate baker accepts external stakers; if they do not, you’ll have to change your baker before staking.
a) If you’re not yet delegating to a baker
 Click Select baker and continue to see a list of available bakers.
b) If you’re already delegating to a baker that DOES NOT accept external staking
If you’re already delegating to a baker and your baker doesn’t accept external staking, you’ll see a note asking you to select a different baker in order to stake.
 To continue, click on the Change button (highlighted) right next to the baker’s name and continue to select a new baker from the list.
 Select your preferred baker from the list to start delegating.
By choosing a baker to delegate to, your account’s entire balance will increase the chosen baker’s consensus and voting rights. When choosing a baker from the list, pay attention to their current stats (as they may impact the rewards you receive):
- Staking: how many tez that baker is currently staking;
- Free space: how many more tez that baker is still able to stake without becoming overstaked (and thus generating less rewards);
- Fee: the percentage of the rewards that the baker will keep as fee. Note that if the fee percentage is set to 100%, you’ll receive no rewards.
 Confirm the delegation and wait a few seconds.
 Your tez are now delegated and ready to stake.
c) If you’re already delegating to a baker that ACCEPTS external staking
If you’re already delegating to a baker that accepts external staking and you’re happy to stake with them, you can move on to the next step.
3. Staking your delegated tez #
 Next, click on Stake to start the staking process.
 Confirm that you read and agree with the terms of use (note that these terms refer to the use of this staking app interface, and that they don’t govern either staking or delegation).
 Enter the amount of tez you’d like to stake.
 When prompted, confirm the operation to continue and wait a few seconds for the transaction to go through.
 That’s it! Your tez are now staked and earning rewards.
Unstaking your tez #
 Unstaking is straightforward. Simply click on Unstake to get started.
 When you submit a request to unstake your tez, you must wait 4 cycles (approximately 10 days) for your funds to unlock before you can Finalize the process.
 Confirm the operation in your wallet and wait a few seconds for the transaction to go through.
 You should now see your unstake request on the dashboard, under Pending Unstake Requests. Come back after 4 cycles (or around 10 days) to finalize your unstaking and start using your funds again.
 It’s now 10 days later. You are ready to finalize the unstaking process! You should now see a Finalize button appear under Pending Unstake Requests. Go ahead and click that.
 In the confirmation screen that pops up, you should see the amount you requested to unstake under Finalizable Balance. Click Finalize.
 Nicely done! You have now completed the unstaking process. Click Continue to go back to the dashboard view and see your updated tez balance.
 Your available tez balance should now include your previously staked tez minus gas fees. The amount of tez staked should now be set to zero.
While you have successfully unstaked, you’re still delegating to the same baker. You can see this under Delegation, which is currently set to active. If you want to continue delegating, you can stop here. If you’d like to undelegate, read on.
Undelegating your tez #
 To undelegate your tez, make sure you are on the dashboard view. Click on End next to Delegation.
 A pop-up should now appear, indicating the name of your baker. Click on End Delegation to confirm.
 Your delegation has now been ended. To double-check, let’s go back to the dashboard.
 Your delegation status should now be set to inactive. If that’s the case, you are done.
Don’t forget that delegation rewards take approximately eight days to stop. This means that some additional tez might still trickle in from your baker!